

What does an epoxy coating do?
An epoxy-coated neodymium magnet has a polymer barrier that limits contact between the corrosion-sensitive NdFeB and its surroundings. It is worth considering where moisture exposure matters and the surface can remain protected from scraping or impact. A scratch, chipped edge or poorly covered feature can provide a path through that protection.[1] [2]
The coating may sit directly on the magnet or over metallic layers. It does not make every magnet suitable for immersion, and it does not raise the underlying material's magnetic temperature capability. Select the grade and protective system for the same application, including operating peaks, time at temperature, thermal cycling and adhesive cure.[7] Epoxy-coated and epoxy-bonded are different descriptions: the former is a surface finish; the latter refers to a binder within the magnetic material.
Start with the exposure and contact conditions
Identify what reaches the surface, where the magnet touches other parts, and which temperatures it experiences during use and assembly. Those conditions determine whether to evaluate an exposed epoxy finish, change the fit or protect the magnet inside an enclosure.
| Application | What to examine first | Possible direction |
|---|---|---|
| Protected sensor pocket with condensation | Where water collects, whether it drains, and whether insertion damages an edge. | Evaluate epoxy-coated samples in the intended pocket through the wetting and drying cycle. Improve drainage or sealing if moisture remains trapped. |
| Sliding latch or repeated contact | Which face rubs and where edges receive impact. | Consider separating the magnet from contact with a cover or housing. Compare alternative finishes for wear before relying on a polymer barrier. |
| Magnet glued into a housing | The outer finish, space for the adhesive layer (the bond line), and cure temperature. | Test fit and whether the magnet stays attached under the required load, including exposure after cure. |
| Continuous liquid or cleaning-fluid exposure | Fluid composition, concentration, temperature and duration, including joints and exposed edges. | Require evidence for that exposure. If an exposed coating cannot be qualified, assess an enclosure or another material system. |
Four application decisions
Protected sensor pocket with condensation
- What to examine first
- Where water collects, whether it drains, and whether insertion damages an edge.
- Possible direction
- Evaluate epoxy-coated samples in the intended pocket through the wetting and drying cycle. Improve drainage or sealing if moisture remains trapped.
Sliding latch or repeated contact
- What to examine first
- Which face rubs and where edges receive impact.
- Possible direction
- Consider separating the magnet from contact with a cover or housing. Compare alternative finishes for wear before relying on a polymer barrier.
Magnet glued into a housing
- What to examine first
- The outer finish, space for the adhesive layer (the bond line), and cure temperature.
- Possible direction
- Test fit and whether the magnet stays attached under the required load, including exposure after cure.
Continuous liquid or cleaning-fluid exposure
- What to examine first
- Fluid composition, concentration, temperature and duration, including joints and exposed edges.
- Possible direction
- Require evidence for that exposure. If an exposed coating cannot be qualified, assess an enclosure or another material system.
Scratching is a limitation of epoxy protection.[2] Inspect samples after insertion and assembly, before an environmental trial. If the housing scrapes the same edge during every installation, address that contact first.
Use the coating comparison and nickel coating guide to consider alternatives. The actual coating system still needs to match the liquid, temperature and wear conditions.
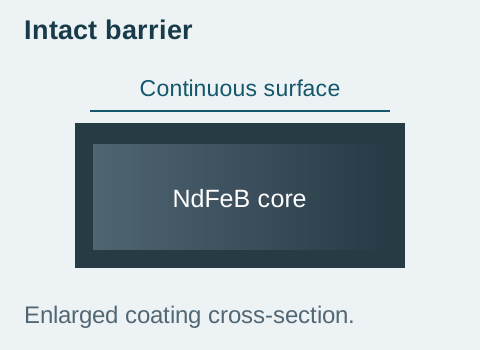
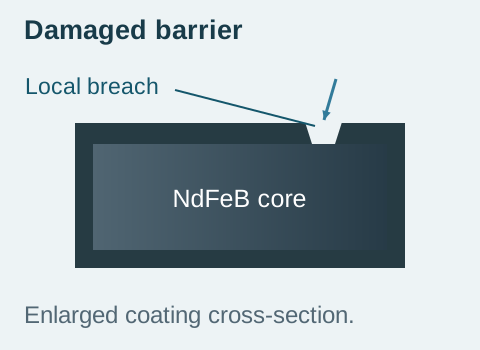
What is underneath the black surface?
Published supplier constructions include epoxy directly on NdFeB, epoxy over nickel-copper, and epoxy over nickel-copper-nickel.[1] [2] All present an epoxy surface, while the layers beneath it differ.

Identify the complete sequence from NdFeB outward and the specified finish. Total coating thickness includes every layer in that sequence. The thickness of the outer epoxy alone leaves out any metal layers underneath. Include changes to those layers or surface preparation when reviewing an alternative finish.
Protection depends on continuity and adhesion over the actual geometry. A coating description for a flat block does not establish coverage at a sharp corner, hole or lamination seam. Define which of those features will contact moisture or another component, then include them in inspection.
Check coated dimensions and adhesive space together
Review the finished magnet, housing clearance and adhesive as one assembly. The bond line is the adhesive layer between the magnet and housing; it needs space as well as a suitable preparation and cure. Check these together before fixing the pocket dimensions.
Amazing Magnets publishes 15 to 25 µm for its Ni-Cu-black-epoxy system and 10 to 20 µm for epoxy only. These examples describe that supplier's systems; use the agreed total coating thickness and finished dimensions for your part.[1]
Example: a coating allowance can remove the clearance
Assume a 3.000 mm bare block and a uniform total coating thickness of 20 µm (0.020 mm) on each opposing face. Its nominal finished thickness is 3.000 + 2 × 0.020 = 3.040 mm. A 3.020 mm pocket is now 0.020 mm smaller than the magnet, even before adhesive is added.
Review the coated magnet dimensions, pocket size and required adhesive thickness together, including their tolerances. Forcing the thicker part into the pocket may damage its protective surface. If the drawing already specifies coated dimensions, the coating allowance is already included.
Retention means the magnet stays attached under the required load. It depends on the adhesive joint and on the outer finish remaining attached to the magnet. A coating can separate while the glue remains bonded to it.[3] Check the whole joint after the intended cure and environmental exposure.
Use cleaning, preparation and curing instructions compatible with both mating surfaces and the exact adhesive.[6] A coating and an adhesive both called “epoxy” still need to be checked together. Avoid preparation that breaks through the protective layer.
Added coating and adhesive also increase separation from a magnetic counterpart. Include those distances in a close-gap design; unchanged material grade does not establish unchanged assembly force.[8] Use the dimensional inspection guide to define the finished fit.
Does the test report support your intended use?
Read the tested part, exposure and acceptance limits before using a reported pass to choose a finish. A test may allow visible rust while setting separate limits on mass and magnetic performance.
Example: why these rusty samples passed
Bunting reports testing ten epoxy-coated N50SH laminated bread-loaf magnets in continuous 5% NaCl spray at 35°C for 408 hours. All developed small rust spots at corners or edges, yet met the project's acceptance limits.[4]
| Endpoint | Reported outcome | Project limit |
|---|---|---|
| Visible rust area | Small local spots, below the permitted area. | No more than 10% of surface area. |
| Mass loss | Worst sample: 1.924%. | Less than 5%. |
| Magnetic moment loss | Worst sample: 0.453%. | Less than 5%. |
Three distinct endpoints in that reported test
Visible rust area
- Reported outcome
- Small local spots, below the permitted area.
- Project limit
- No more than 10% of surface area.
Mass loss
- Reported outcome
- Worst sample: 1.924%.
- Project limit
- Less than 5%.
Magnetic moment loss
- Reported outcome
- Worst sample: 0.453%.
- Project limit
- Less than 5%.
Here magnetic moment measures the magnet's overall magnetic dipole strength; it is not a local surface-gauss reading or a pull-force result. The samples passed because their results stayed within all three limits. The evidence applies to that coating, geometry and sample set.[4]
What still needs checking for your assembly?
A visible product may require less rust than this project allowed. For a glued component, this result does not establish that your adhesive joint will stay attached or that your sensor will respond correctly after exposure. Set limits for those required functions and test the intended assembly.
ISO 9227's public scope leaves duration and interpretation to the product specification and cautions against predicting service life from salt-spray results.[5] Keep the tested part, coating, exposure and acceptance limits with the report. Use the corrosion guide when investigating a difference between test and service conditions.
A practical starting point for a glued sensor magnet
For an epoxy-coated magnet glued into a sensor housing, first address trapped water and installation damage. Confirm space for the coated magnet and adhesive, then check assembled samples after the actual cure and moisture cycle. Record whether the joint stays attached and whether the sensor response meets its requirement.
Use the brief below to start a discussion; mark undecided details as open questions.
Epoxy-coated magnet application brief
Drawing / revision / finished dimensions:
Material grade and pole direction:
Layer sequence / total coating thickness, if known:
Wetting, drainage, contact and wear locations:
Fluid, temperature and exposure duration:
Housing fit, adhesive type / layer thickness / cure:
Required appearance, attachment strength and magnetic response:
Sample quantity / order quantity / required evidence:
Send the drawing and exposure details through a custom magnet inquiry. Nike Industrial Trading handles supply inquiries; the proposed finish, available records and order terms are confirmed for the part.
Technical sources
Read each source with its stated material, test conditions and publication scope.
- Amazing Magnets — Plating & CoatingsExamples of this supplier's coating sequences and thickness ranges.
- supermagnete — Questions and answers about magnet coatingsEpoxy and nickel layer constructions and the effect of surface damage.
- Eclipse Magnetics — NdFeB Standard Range, rev. 1NdFeB standard-range technical sheet, revision 1: coatings and adhesive interfaces on pages 2 to 4.
- Bunting E-Magnets — Salt Spray and Neodymium MagnetsCase study of epoxy-coated laminated N50SH samples, test conditions and project acceptance limits.
- ISO 9227:2022 — Salt spray tests, public scopePublic scope of the salt-spray test method, including limits on interpreting results as service life.
- K&J Magnetics — Sticky Business: How to Glue Neodymium MagnetsAdhesive selection, surface cleaning and curing for magnet assemblies.
- Arnold Magnetic Technologies — Neodymium Iron Boron MagnetsMagnet material selection, temperature and application requirements.
- Radial Magnet — Epoxy Coated Neodymium MagnetsCoating specifications and the contribution of coating thickness to the working gap.